
A simple workflow tool for imaging optical media using readom and ddrescue
In 2015 I wrote a blog post on preserving optical media from the command-line. Among other things, it suggested a rudimentary workflow for imaging CD-ROMs and DVDs using the readom and ddrescue tools. Even though we now have a highly automated workflow in place for bulk processing optical media from our deposit collection, readom and ddrescue still prove to be useful for various special cases that don’t quite fit into this workflow. The materials that we are currently receiving as part of our web archaeology activities are a good example. These are typically small sets of recordable CD-ROMs that are often quite old, and such discs are highly likely to be in less than perfect condition. For these cases a highly automated, iromlab-like workflow is unnecessary, and to some degree even impractical. Nevertheless, it would be useful to have some degree of automation, especially for things like the addition and packaging of associated metadata. This prompted the development of the omimgr workflow tool. In the the remainder of this blog post I will give an overview of omimgr.
The command-line workflow
In my 2015 blog post I reviewed a number of command-line imaging tools for optical media. For CD-ROMs and DVDs I recommended to first try imaging the disc with readom, and use ddrescue in case readom fails. The logic behind this is that readom was specifically designed for reading optical media, which makes it preferable over generic block device recovery tools such as Guymager, dd or ddrescue. However, readom gives up rather easily on discs that are damaged or otherwise degraded, and for these cases ddrescue is often capable of recovering surprising amounts of data. For example, our earlier success at resurrecting the first Dutch web index was largely thanks to ddrescue’s ability to work its magic on the degraded CD-recordable that contained the source data. So, a basic command-line workflow that is based on readom and ddrescue would look like this:
-
Unmount the disc:
umount /dev/sr0 -
Try to create an ISO image of the disc with readom:
readom retries=4 dev=/dev/sr0 f=disc.iso -
If readom fails, try to image the disc with ddrescue:
ddrescue -b 2048 -r4 -v /dev/sr0 disc.iso disc.map -
If ddrescue was unable to recover all the data on the disc, try to improve the result by re-running ddrescue in direct disc mode:
ddrescue -d -b 2048 -r4 -v /dev/sr0 disc.iso disc.map -
If there are still read errors after the above command, try to improve the result by re-running ddrescue with another optical drive (e.g. an external USB-drive):
ddrescue -b 2048 -r4 -v /dev/sr1 disc.iso disc.map(Note that steps 4 and 5 can be repeated for mutiple optical drives, if needed).
-
Check the extracted ISO image for completeness with isolyzer:
isolyzer disc.isoIf the value of the smallerThanExpected element equals False, this is an indication that the ISO image is probably intact.
However, this is only part of the story. In most cases we will also want to record various types of metadata about the created disc image. A pretty minimal set includes:
-
Fixity information: a SHA-512 checksum of the ISO image.
-
Descriptive metadata: an identifier that is associated with the disc, a description (this may simply be copied from the writing on a disc or its inlay card), and a text annotation for recording anything else about the disc that is noteworthy (e.g. its condition, or the fact that the entered description was based on handwritten text that is not clearly legible).
-
Event metadata about the image acquisition process: the imaging software (and its associated version) that was used, the options it was invoked with, the status of the imaging process, and the outcome of any quality checks on the generated ISO image.
Adding these metadata by hand is pretty cumbersome, especially when processing multiple discs. It is also prone to all sorts of errors. So, I wrapped all the imaging, quality checks and metadata generation into a user-friendly piece of software with a graphical interface, similar to the earlier tapeimgr tool (which served as a template for omimgr).
Omimgr operation
Imaging optical media with omimgr is simple. On start-up, it shows the following entry form:
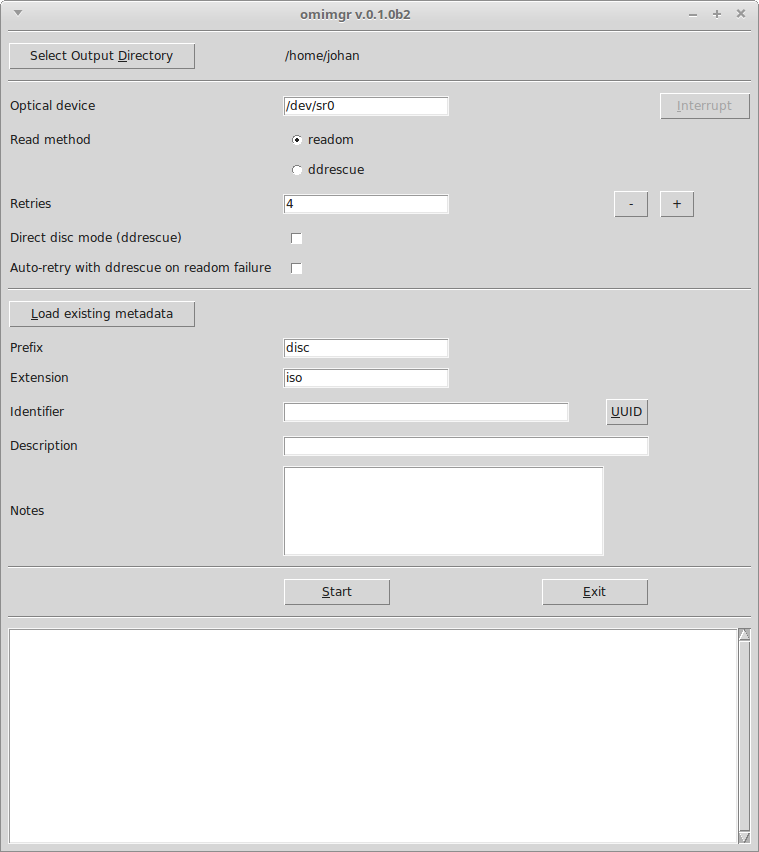
The entry fields are largely self-explanatory (but they are all documented here). The user can select an output directory, specify a device path that points to the optical drive (by default it uses the internal drive at /dev/sr0), and a preferred read method (by default omimgr starts with readom)1. There is also a set of entry fields for basic descriptive metadata, and it is possible to assign an identifier (or generate one automatically). Imaging starts after the user presses the Start button.
If readom fails
If the initial attempt to image a disc with readom resulted in any errors, omimgr shows the following dialog box:
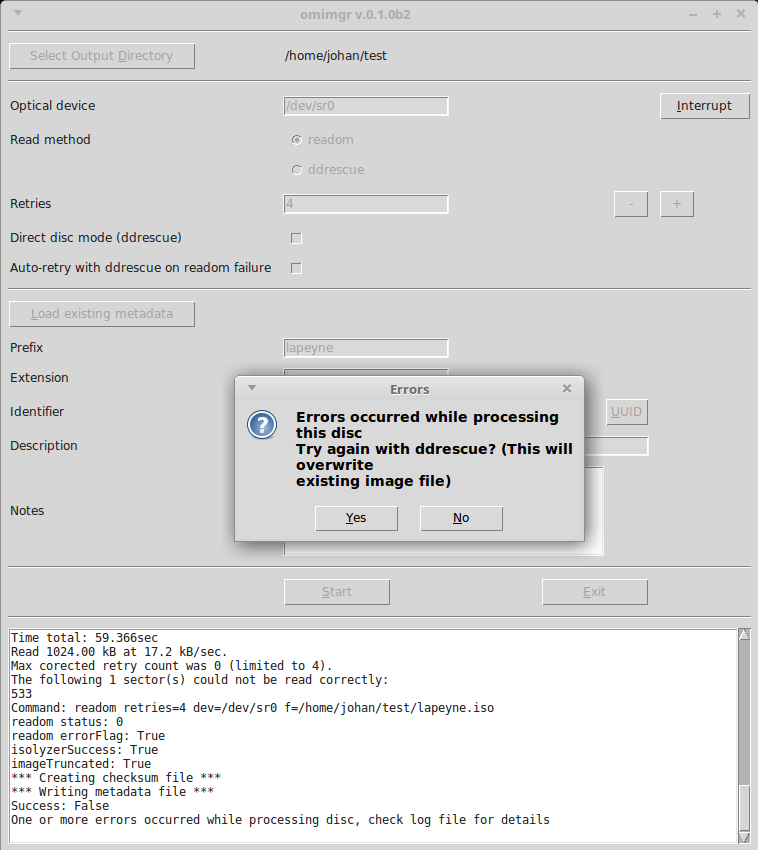
After pressing Yes, omimgr tries to image the disc with ddrescue2. If the ddrescue run resulted in any errors as well, omimgr offers the possibility to re-run it with different settings. There is no limit on the number of successive ddrescue runs on a disc, and, importantly, new runs do not overwrite the existing ISO image, but instead improve upon it. This makes it possible to use multiple optical drives on a disc.
Interrupting and resuming
Since ddrescue may need a lot of time to recover data from a faulty disc (12-24 hours is no exception), it is possible to interrupt ongoing imaging processes with the Interrupt button. Interrupted ddrescue sessions can be resumed at any later time by selecting the session’s output directory. The Load existing metadata button will then load any previously entered descriptive metadata.
Metadata
A the end of each session, omimgr writes a metadata file in JSON format. Here’s an example:
{
    "acquisitionEnd": "2019-03-22T13:38:51.969934+01:00",
    "acquisitionStart": "2019-03-22T13:37:43.060185+01:00",
    "autoRetry": false,
    "checksumType": "SHA-512",
    "checksums": {
        "backupjrc.iso": "714426e7f965e4f6b33571ae4d60d945928dbee8c06f74225a138eaaa4ea4b2b7442620227e94920a0bc7ac17a6c7096fb310746cfff2c04b5c3e778ae8998ce"
    },
    "description": "Backup JRC 31-03-2000",
    "extension": "iso",
    "identifier": "e23f9158-4c9e-11e9-bbfc-dc4a3e413173",
    "imageTruncated": false,
    "interruptedFlag": false,
    "isolyzerSuccess": true,
    "maxRetries": "4",
    "notes": "Outer edge of CD shows signs of corrosion",
    "omDevice": "/dev/sr1",
    "omimgrVersion": "0.1.0",
    "prefix": "backupjrc",
    "readCommandLine": "readom retries=4 dev=/dev/sr1 f=/home/johan/test/backupjrc.iso",
    "readMethod": "readom",
    "readMethodVersion": "readom 1.1.11 (Linux)",
    "rescueDirectDiscMode": false,
    "successFlag": true
}
Note that the metadata file contains all of the entered descriptive metadata, a SHA-512 checksum of the ISO image, and a host of event metadata.
Limitations
Currently, omimgr only works on Linux-based systems. It does not support audio CDs, and can only be used for CD-ROMs and DVDs. Blue Book / CD-Extra discs aren’t supported either. I wouldn’t rule out that these types of discs may eventually be supported in some future version of omimgr, but for now they don’t have any priority (currently the main use case is the imaging of recordable CD-ROMs and DVDs).
It is also worth noting that omimgr only exposes a limited subset of readom’s and ddrescue’s functionality to the user. If you are looking for a full graphical front-end to ddrescue that gives access to all of its options, you should probably check out DDRescue-GUI instead3. Finally, the current version of omimgr is an initial release, which so far has had limited testing, so use at your own risk (as always), and feel free to report any issues that you may come across.
Link to omimgr
Omimgr and its documentation can be found here:
omimgr - Simple workflow tool for imaging optical media
-
Note that most of the default values shown here can be easily changed by modifying a configuration file. ↩
-
Checking the Auto-retry option bypasses this dialog, in which case omimgr will automatically start ddrescue without any user intervention. ↩
-
Incidentally omimgr contains a few lines of code that I borrowed from DDRescue-GUI. ↩
-
optical-media
- Identification of physical storage media and devices with Python and the Windows API
- Introducing Isolyzer 1.4
- Offline digital data carriers in the KB deposit collection
- A simple workflow tool for imaging optical media using readom and ddrescue
- Resurrecting the first Dutch web index: NL-menu revisited
- Update on Isolyzer: UDF, HFS+ and more!
- Image and Rip Optical Media Like A Boss!
- Imaging CD-Extra / Blue Book discs
- Detecting broken ISO images: introducing Isolyzer
- Breaking WAVEs (and some FLACs too)
- Preserving optical media from the command-line

Comments