
Recovering '90s Data Tapes - Experiences From the KB Web Archaeology project (iPres 2019 paper)
Earlier this year I published this blog post on the recovery of data from ’90s data tapes. I will give a presentation on this during the upcoming iPres 2019 conference, and wrote a paper that discusses this work in more detail than my earlier blog post. The original paper (in PDF format) can be found here. The paper references a wealth of useful resources, but some of these are not easily accessible because the LaTeX template used does not handle hyperlinks well (this will be fixed in the final, post-conference version of the paper). Because of this I’ve created a web-friendly version of the paper below.
Abstract
The recovery of digital data from tape formats from the mid to late ’90s is not well covered by existing digital preservation and forensics literature. This paper addresses this knowledge gap with a discussion of the hardware and software that can be used to read such tapes. It introduces tapeimgr, a user-friendly software application that allows one to read tapes in a format-agnostic manner. It also presents workflows that integrate the discussed hardware and software components. It then shows how these workflows were used to recover the contents of a set of DDS-1, DDS-3 and DLT-IV tapes from the mid to late ’90s. These tapes contain the source data of a number of “lost” web sites that the National Library of the Netherlands (KB) is planning to reconstruct at a later stage as part of its ongoing Web Archaeology project. The paper also presents some first results of sites from 1995 that have already been reconstructed from these tapes.
Keywords – tapes, digital forensics, web archaeology
Conference Topics – The Cutting Edge: Technical Infrastructure and Implementation
Introduction
When the National Library of the Netherlands (hereafter: KB) launched its web archive in 2007, many sites from the “early” Dutch web had already gone offline. As a result, the time period between (roughly) 1992 and 2000 is under-represented in the web archive. To improve the coverage of web sites from this historically important era, the KB has started to investigate the use of tools and methods from the emerging field of “web archaeology” [1]. Analogous to how archaeologists study past cultures from excavated physical artefacts, web archaeology is about reconstructing “lost” web sites using data that are recovered from old (and often obsolete) physical carriers. It is worth noting that Ross and Gow introduced the concept of “digital archaeology” (of which web archaeology is a special case) as early as 1999 [2].
Over the last year, the KB web archiving team has reached out to a number of creators of “early” Dutch web sites that are no longer online. Many of these creators still possess offline information carriers with the original source data of their sites. This would potentially allow us to reconstruct those sites, and then ingest them into the web archive. The overall approach would be similar to how we already reconstructed the first Dutch web index NL-Menu in 2018 [3], [4].
A few of these creators have already provided us with sample sets of carriers which, though limited in size, comprise a range of physical formats, such as CD-ROMs, floppy disks, ZIP disks, USB thumb drives, and (internal) hard disks. One sample set was provided to us by the former owners of xxLINK, a web development and hosting company that was founded in 1994. It was the first Dutch company that provided these services, and throughout the ’90s xxLINK created web sites for a large number of well-known Dutch companies and institutions1. A particularly interesting feature of the xxLINK sample set is that it includes 33 data tapes.
There is a relative wealth of digital preservation and digital forensics literature on the recovery of data from physical carriers. Examples include Ross and Gow [2], Elford et al. [5], Woods and Brown [6], Woods et al. [7], Lee et al. [8], John [9] and Pennock et al. [10]. For many carrier types published workflow descriptions are readily available (see e.g. Prael and Wickner [11], Salo [12] and the workflows published by the BitCurator Consortium [13], to name but a few). Even though these cover a wide range of physical carrier types, the existing literature provides surprisingly little information on how to recover data from legacy tape formats. One of the few exceptions are De Haan [14] and De Haan et al. [15], who describe how they rescued 11 GB worth of data from three DLT tapes. However, they do not provide much detail about the hardware and software setup they used for this.
Reading these legacy tape formats presents a number of challenges. First, it requires specific hardware that is now largely obsolete. This includes not only the actual tape readers, but also host adapters that are needed to connect a tape reader to a modern forensic workstation, cables and adapter plugs. Because of this, finding the “right” hardware setup is often not straightforward. Furthermore, since the original software that was used to write (and read) legacy data tapes may not be available anymore (if it is known at all), the tapes should be read in a format-agnostic way at the block device level. This can be done with existing software tools, but these tools are not very user-friendly, and the resulting workflows can be quite unwieldy. Also, the logical interpretation of data files that have been recovered from tape requires some additional work. Finally, even though there are still various online resources that cover reading these tapes2, the information they provide is often fragmentary, or geared towards specific backup software or hardware. This is especially true for older resources that date back to the time when these tape formats were in heavy use.
Hence, there appears to be a knowledge gap. The overall aim of this paper is to fill this gap by discussing the hardware and software that can be used to read such tapes, and by presenting practical workflows that allowed us to recover the information from the xxLINK tapes. These workflows are largely based on current hard- and software. They are also fully open source, and can be easily integrated into Linux-based platforms, including the popular BitCurator3 environment.
Outline
This paper starts with a brief overview of the tape formats in the xxLINK sample set. This is followed by a discussion of the hardware that is needed for accessing tapes like these. This section also provides some suggestions that will hopefully be useful to others who are starting similar tape-related work. It then suggests a format-agnostic procedure for reading the data on the tapes, and presents a new software application that was developed specifically for reading tapes in a simple and user-friendly manner. Next follows a discussion of how this hardware and software setup were integrated into workflows, and how these workflows were used to recover the data on the xxLINK tapes. This is followed by two sections that explain the further processing of the recovered data: the extraction of the resulting container files, and the subsequent reconstruction of any “lost” web sites whose underlying data are enclosed in them. This section also shows some first results of sites that were recovered from a 1995 tape. The closing section summarizes the main conclusions.
Tape formats
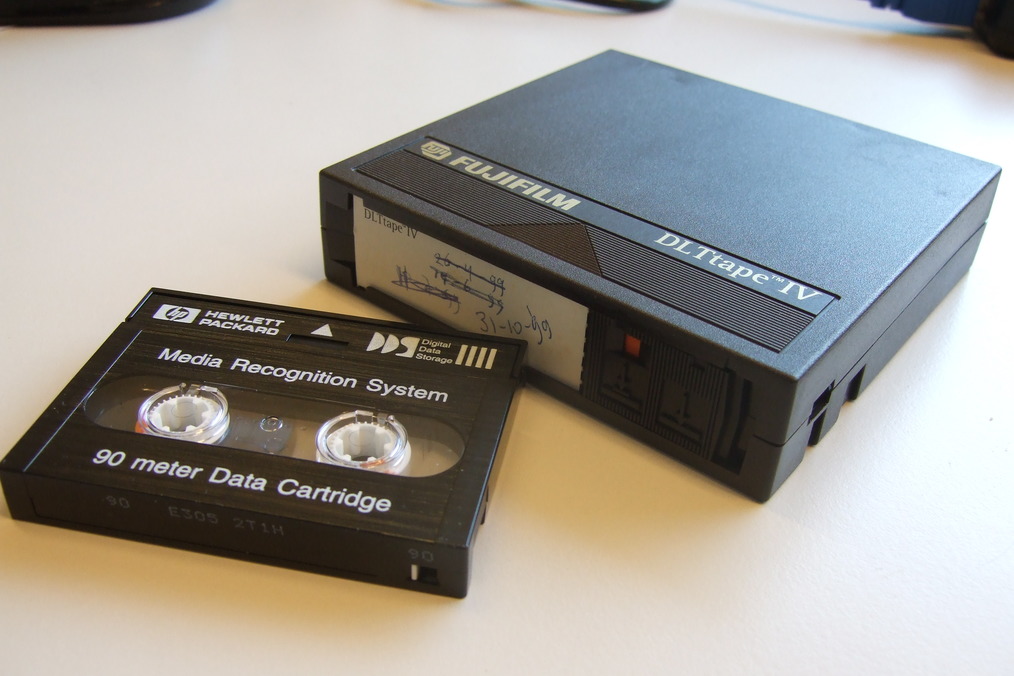
The majority (19) of the tapes in the xxLINK sample set are DDS tapes, most of which were written in 1995. DDS (Digital Data Storage) is a family of tape formats that are based on Digital Audio Tape (DAT). Using the product codes I was able to identify the majority of these DDS tapes as DDS-1, which was the first generation of DDS. DDS-1 was introduced in 1989, and has a maximum capacity of 2 GB (uncompressed), or 4 GB (compressed). Two tapes could be identified as DDS-3, a format which was introduced in 1996 with a maximum capacity of 12 GB (uncompressed), or 24 GB (compressed). A total of 7 DDS generations have been released, the final one being DAT-320 in 20094. Backward read compatibility of DDS drives is typically limited to 2 or 3 generations5. The xxLINK set also contains 14 DLT-IV tapes which were mostly written in 1999. DLT-IV is a member of the Digital Linear Tape (DLT) family of tape formats, which dates back to 1984. DLT-IV was first introduced in 19946, and has a capacity of up to 40 GB (uncompressed), or 80 GB (compressed)7. Figure 1 shows what these tapes look like.
Hardware
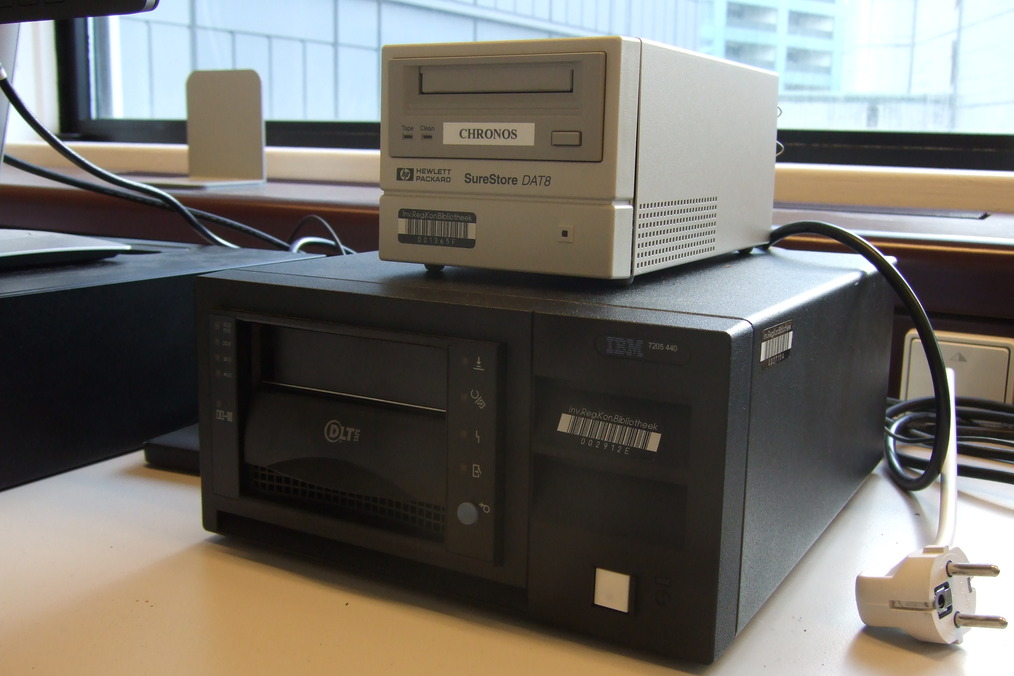
For all data recovery workflows that are part of the web archaeology project I set up a dedicated forensic workstation that is running the BitCurator environment. Reading the vintage tape formats in the xxLINK sample set requires some specific additional hardware, most of which can be bought used online at a low to moderate cost. Luckily, it turned out our IT department was still in the possession of an old (DDS-1-compatible) DDS-2 drive, as well as a DLT-IV drive. Both drives are shown in Figure 2.
In order to read the DDS-3 tapes, I purchased an additional used DAT-72 drive that has backward-compatibility with DDS-3.
SCSI host adapter
As all three tape drives have parallel SCSI8 connectors, I needed a SCSI host adapter (“SCSI card”) to connect them to the forensic workstation. Used SCSI cards can be easily found online, and they are usually sold cheaply. Nevertheless, finding a model that was compatible with both our workstation and the tape drives turned out to be somewhat complicated. This is due to a number of reasons.
First, SCSI cards often have interfaces that are not compatible with current hardware. Many older models have a conventional PCI interface9, but PCI has been largely replaced by PCI Express10 on modern motherboards and desktop machines. Some cards have a 64-bit PCI interface, which is only compatible with enterprise servers.
Even if the interface is compatible, the physical dimensions of the card can cause further complications. Older “full-height” PCI Express cards will not fit into a “low-profile” (also known as “half-height”) slot, and vice versa (most modern machines only support “low-profile” cards). Many cards were originally sold with both a “full-height” and a “low-profile” bracket, which allows one to easily change the bracket to fit the target machine. Buying second-hand, it is not uncommon to find that either of the original brackets are missing.
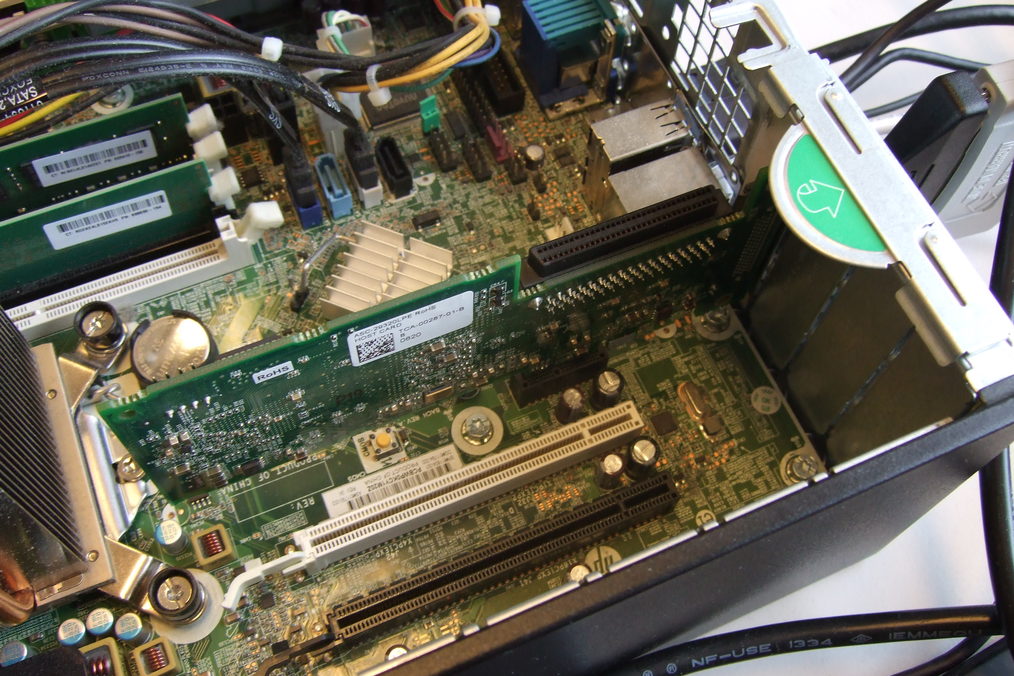
Online sellers do not always explicitly mention characteristics like these, and even if they do this information is not necessarily accurate. A useful resource in this regard is the web site of the Microsemi company, which has the technical specifications of the full range of Adaptec SCSI adapters11. Figure 3 shows the PCI Express host adapter that we are using in our workstation.
SCSI connectors and terminators
Rather than being one well-defined standard, parallel SCSI is actually a family of related standards that comprise a host of different interfaces, not all of which are mutually compatible12, 13. None of these standards specify what connectors should be used to interconnect SCSI devices. Over time, this has resulted in a myriad of connector types that have been developed by different manufacturers14. These are typically identified by multiple names. As an example, the commonly used 68-pin “DB68” connector is also referred to as “MD68”, “High-Density”, “HD 68”, “Half-Pitch” and “HP68”, whereas the “50-contact, Centronics-type” connector is alternatively known as a “SCSI-1” or “Alternative 2, A-cable connector”. This complicates both identifying the connector type on a particular device, as well as finding suitable adapter plugs and cables. For identifying a connector, the web site of Paralan provides a useful illustrated overview of the most common types15.
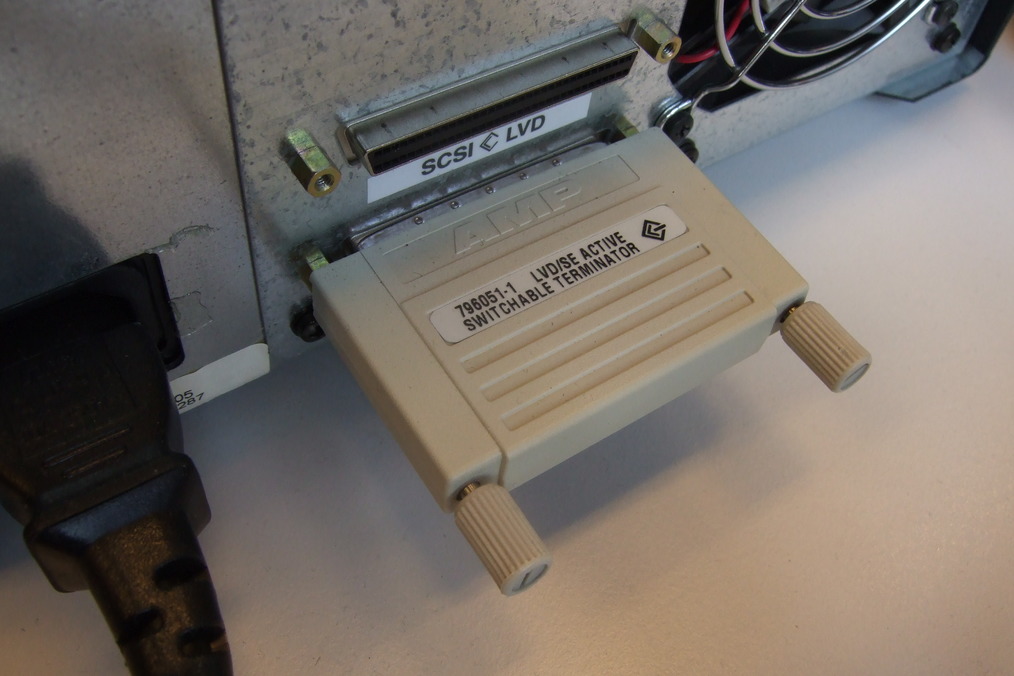
If the tape reader is the last device at either end of the SCSI chain, it must be fitted with a “terminator”16, which is a resistor circuit that prevents the electrical signal from reflecting back from the ends of the bus. Without a terminator, the tape drive will not work properly, or, more likely, it will not work at all. External SCSI devices like our tape drives use terminator plugs, as shown in Figure 4. For internal devices, termination is often achieved through jumper settings, or by physically removing the terminating resistors from their sockets17.
Cleaning cartridges
Over time, the heads of a tape drive will get dirty due to a gradual accumulation of dust, and sometimes also residue from the tapes that are used. As this ultimately results in read errors, it is important to periodically clean the drive with a dedicated cleaning cartridge. Most drives have an indicator that lights up when cleaning is needed. The cleaning procedure is usually very simple, and involves nothing more than inserting the cleaning cartridge into the machine, which then automatically starts the cleaning cycle. A single cleaning cartridge can be used multiple (typically about 50) times. Although I was able to purchase cleaning cartridges for both the DDS and the DLT-IV drives online, it is unclear whether new cartridges are still manufactured today. Since it is not easy or even recommended to clean these drives manually (in fact this is likely to result in damage), the availability of cleaning cartridges could be a concern for keeping older tape formats like these accessible in the long run.
Software
Once the hardware is set up, a number of options are available for reading the data from the tapes. Often, tapes contain backup archives that were written by backup utilities such as tar, cpio, dump or NTBackup, to name but a few. One approach would be to restore the contents of each tape using the original software that was used to write it. Even though many of these utilities are still available today (especially the Unix-based ones), this approach is not a practical one. First of all, it would require prior knowledge of the tape’s archive format. Although we may sometimes have this knowledge (e.g., the writing on a tape’s label may indicate it was created with the tar utility), in practice we often simply don’t know how a tape was written at all. Also, this approach would complicate things, because each format would require its own custom workflow. Finally, it would not work with formats for which the original software is not readily available on the forensic workstation (e.g. the Microsoft Tape Format that was used by Windows NTBackup).
A better approach is to use tools like dd18 which are able to read data directly at the block device level. This way, tapes can be read in a format-agnostic manner. The general idea here is that we use dd to read all archive files on a tape, irrespective of their format. We then use format identification tools such as file(1)19, Apache Tika20, Fido21 or Siegfried22 to establish the format of each archive file, and subsequently use dedicated, format-specific utilities to extract their contents. This is similar to existing forensic workflows that are used for other carrier types in e.g. BitCurator.
Reading a tape with dd and mt
In the simplest case, reading data from a tape involves nothing more than a dd command line such as this one:
dd if=/dev/nst0 of=file0001.dd bs=16384
Here, the “if” argument tells dd to read input from the non-rewind
block device /dev/nst0, and the value of “of” defines the file where
output is written. The “bs” argument defines a block size (here in
bytes), and this is where the first complication arises. The actual
value that must be used here depends on the software that was used to
write the tape, and its settings. If dd is invoked with a value that
is too small, it will fail with a “cannot allocate memory” error. After
some experimentation I was able to establish the block size using the
following iterative procedure:
-
Starting with a block size of 512 bytes, try to read one single record (and direct the output to the null device, as we don’t need it):
dd if=/dev/nst0 of=/dev/null bs=512 count=1 -
Position the tape 1 record backward using the mt23 tool (this resets the read position to the start of the current session):
mt -f /dev/nst0 bsr 1 -
If step 1 raised an error in dd, increase the block size value by 512 bytes, and repeat from step 1.
Repeating these steps until dd exits without errors will yield the correct block size. Re-running the dd command at the start of this section with this value will recover the first session on the tape to a single output file. This leads to a second complication: a tape may contain additional sessions. We can test for this by positioning the tape 1 record forward with the mt tool:
mt -f /dev/nst0 fsr 1
If the mt call doesn’t result in an error (i.e. mt’ s exit code equals zero), at least one additional session exists. In that case we use mt again to position the tape 1 record backward (the start of the second session). We then repeat the block-estimation procedure for the second session, and read the data with dd.
All of the above steps are repeated until mt’s fsr command results
in a non-zero exit code, which means no additional sessions exist. The
end result is that for each session on the tape we now have a
corresponding output file.
Tapeimgr
Even though the above procedure is not particularly complicated, having to go through all these steps by hand would be very cumbersome. Moreover, dd’s ability to overwrite entire block devices with one single command introduces a high risk of accidental data loss (hence its “destroy disk” nickname). Also, it would be useful to have a more user-friendly method for reading data tapes. Because of these reasons, I developed tapeimgr24, which is a software application that allows one to read data tapes using a simple, easy-to-use graphical user interface. Written in Python, it was loosely inspired by the popular Guymager forensic imaging software25. Internally, tapeimgr just wraps around dd and mt, but it completely hides the complexities of these tools from the user. The software runs on any Linux distribution, and can be installed with pip, Python’s default package manager. Its only dependencies are a recent version of Python (3.2 or more recent), the TkInter package, and dd and mt. All of these are present by default on most modern Linux distros.
Figure 5 shows tapeimgr’s interface.
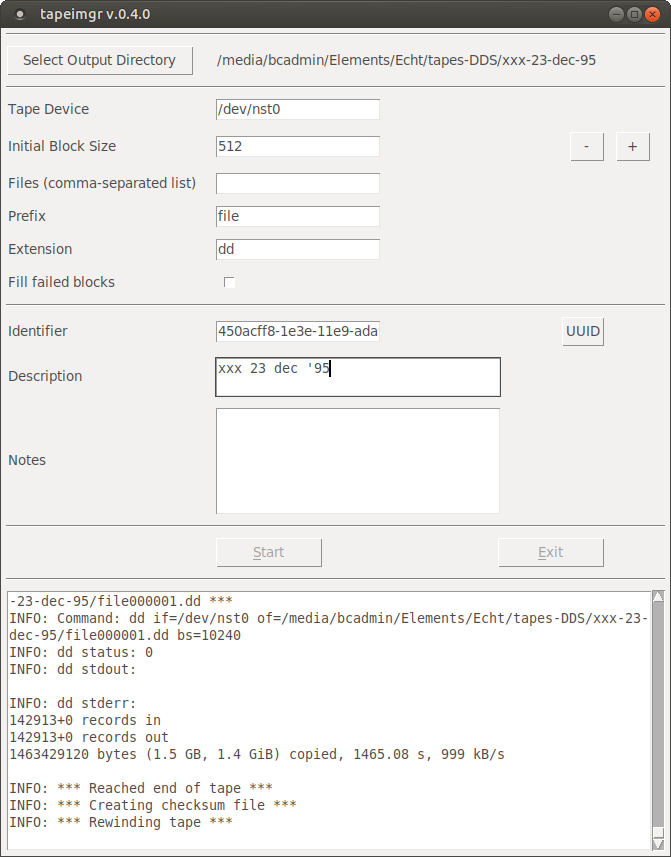
At the very minimum, a user must select a directory to which all output for a given tape is written. If necessary, the read process can be further customized using a number of options that are described in detail in the tapeimgr documentation. There are also entry fields for descriptive metadata, and the values that are entered here are written to a metadata file in JSON format. This file also contains some basic event and technical metadata, including SHA-512 checksums of each session (which is represented as a file) that is read from the tape. After the user presses the Start button, the progress of the tape reading procedure can be monitored from a widget at the bottom of the interface; the information displayed here is also written to a log file. When tapeimgr has finished reading a tape, it displays a prompt that tells the user whether the read process completed successfully. In case of any problems, the log file contains detailed information about all steps in the tape reading process. In addition to the graphical user interface, tapeimgr also has a command-line interface, which makes it possible to integrate it into other applications.
Limitations of tapeimgr
At this stage, tapeimgr has two important limitations. First, it only supports tapes for which the block size is constant within each session. More recent tape drives are often capable of writing tapes in “variable block” mode, where the block size within a session varies. This is not supported, although a possible (but so far untested) workaround may be to set the Initial Block Size to some arbitrary large value that is equal to or larger than the overall largest block size on the tape26. Variations in block size between sessions are no problem, and are fully supported. Also, tapeimgr is not able to recover data from tapes that were partially overwritten. As an example, suppose that a tape originally contained 3 sessions with a size of 200 MB each. If someone later overwrote part of the first session with a 10 MB session at the start of that tape, running the tape through tapeimgr will only recover the first 10 MB session, and ignore the remaining sessions. The reason for this is that each write action adds an “End Of Media” (EOM) marker just beyond the end of the written data, and once an EOM is written, any previously recorded data beyond that point are no longer accessible (reportedly workarounds exist, but these are specific to kernel drivers)27.
Reading the xxLINK tapes
With all the hardware and software in place, I first experimented with reading some unimportant, disposable DDS-1 and DLT-IV test tapes. Based on these tests I designed processing workflows, which I then documented by creating detailed descriptions that cover all steps that have to be followed to read a tape28. Once I was confident that the workflows were sufficiently robust, I applied them to the xxLINK tapes. All but one of the DDS-1 tapes could be read without problems. For one tape, the recovery resulted in a 10-kB file with only null bytes, which most likely means the tape is faulty. The two DDS-3 tapes could be read successfully as well. Most of these tapes contained multiple (up to 4) sessions. Of the 14 DLT-IV tapes, only 7 could be read without problems. For the remaining 7, the reading procedure resulted in a zero-length file, which means the tape drive interprets them as empty. A common characteristic of all “failed” DLT-IV tapes is that they were written at 40 GB capacity, whereas the other tapes were written at 35 GB capacity. This is odd, as our DLT-IV drive does in fact support 40 GB capacity tapes (this was confirmed by writing some data to a blank test tape at 40 GB capacity, which could subsequently be read without problems). Although the exact cause is unknown at this stage, it is possible that these tapes are simply faulty, or perhaps they were erased or overwritten at some point. Interestingly, the label on at least one of the problematic tapes contains some writing that suggests it was already faulty around the time it was written. Table 1 gives a brief summary of the above results.
| DDS-1 | DDS-3 | DLT-IV | |
|---|---|---|---|
| # tapes | 17 | 2 | 14 |
| # read successfully | 16 | 2 | 7 |
Table 1: Summary of xxLINK tapes read results
Extraction of recovered container files
It is important to stress that the above tapeimgr-based workflow only recovers the contents of the tapes at the bit level: for each session on the tape it results in one bitstream (file). Additional steps are needed to interpret the recovered bitstreams in a meaningful way. At the very the minimum two additional steps are necessary. First we need to identify the format of the container files that were recovered from the tapes. Once the container format is known, we can (hopefully) find some format-specific software that is capable of extracting the content of the container files. For format identification I ran the Unix file(1) command (v. 5.32)29 on all recovered files. The results are summarized in Table 2.
| Format (file(1)) | Number of files |
|---|---|
| new-fs dump file (big endian) | 28 |
| new-fs dump file (little endian) | 8 |
| tar archive | 4 |
| POSIX tar archive | 2 |
| POSIX tar archive (GNU) | 5 |
Table 2: Formats of recovered files according to file(1)
Most files in the xxLINK data set are Unix dump archives30. Dump is an old backup utility, and its archive files can be extracted using the restore tool31. Even though dump and restore are largely obsolete today, the software is still available in the Debian repositories, and as a result these tools can be easily installed on most Linux-based platforms. A few words of caution: first, by default restore extracts the contents of a dump file to the system’s root directory, i.e. it tries to recover a full backup. For our purposes this behaviour is clearly unwanted, and could even wreak havoc on the forensic workstation’s file system. However, extraction to a user-defined directory is possible by running restore in “interactive” mode32. A disadvantage of having to use the interactive mode is that it makes bulk processing of dump files virtually impossible. This could be a serious problem when one has to deal with very large numbers of these files. Second, it is important to check the file system of the disk to which the container file is extracted. I initially tried to extract the dump files to an NTFS-formatted33 external hard disk. However, it turned out that the names of some files and directories inside the archive were not compatible with NTFS, and as a result these files were not extracted. Since the dump archives were originally created from a Unix-based file system, this is not surprising. Also, any file attributes that are not supported by NTFS (e.g. access permissions and ownership) are lost when extracting to NTFS. Extraction to another disk that was formatted as Ext434 (which is the default file system for most Linux distributions) resolved this issue.
The remaining files are all tar archives, a format that is still widely used today. These files can be extracted by simply running the tar35 command like this:
tar -xvf /path/to/file0001.dd > /dev/null
The earlier observations on the file system of the disk to which the container is extracted also apply to tar files.
Using restore and tar I was able to successfully extract the contents of all container files. For a small number of dump files, restore reported errors about missing files that could not be found. Although the exact cause is unknown at this stage, a possible explanation could be that in these cases a single dump was stored as two volumes on separate physical tapes. This will need further investigation. Nevertheless, overall the interpretation of the xxLINK tapes at the container level is quite straightforward.
It is worth noting that the extraction may be more complicated for other container formats. For example, a number of Microsoft backup tools for the Windows platform (e.g. NTBackup) used to write data to tape using the Microsoft Tape Format36. This is a proprietary format that is only officially supported by the original creator software, which is not freely available, and only runs under Windows (however, a few open-source tools exist that claim to support the format). As the xxLINK data set does not include this format, it was not investigated as part of this work.
Reconstruction of sites
Once the contents of the container files are extracted, we can start reconstructing the web sites. At this stage of the Web Archaeology project we have only just made a start with this; however, it is possible to present some first results. As a first step we need to inspect the contents of the data that were extracted from the container files, and identify any files and directories that contain web site data. This includes not only any directories with the sites’ source data, but also server configuration files, which contain valuable information about the sites. For instance, from the configuration files it is possible to see at which domains and URLs they were originally hosted, and how internal forwards were handled. With this information it is possible to host any of the old sites on a locally running web server at their original domains. A detailed discussion of the technical details is beyond the scope of this paper, but the general approach is similar to the one we used earlier to reconstruct the NL-Menu web index in 2018 [3], [4]. It comprises the following steps37:
-
Set up a web server (typically Apache)38, and restrict access to the server to localhost (this ensures that any hosted sites are only accessible locally on the machine on which the server is running).
-
Copy the contents of the site (i.e. its directory tree) to the default root folder used by the web server (typically
/var/www), and update the file permissions. -
Configure the site by creating a configuration file (or by adding an entry to an existing configuration file).
-
Activate the configuration file.
-
Add the site’s domain to the hosts file (
/etc/hosts). -
Restart the web server.
After following these steps, the site is now locally accessible at its original URL, and it can be viewed in a browser, or archived with web crawler software such as wget. Since the directory structure of the web site data on the xxLINK tapes is quite uniform, it was possible to automate these steps to a large extent. Using this approach, I have so far reconstructed about 20 sites from one of the 1995 DDS-1 tapes by hosting them on an Apache web server instance. A few examples will illustrate the diversity of the sites in the xxLINK data set. Figure 6 shows the home page of xxLINK’s web site.
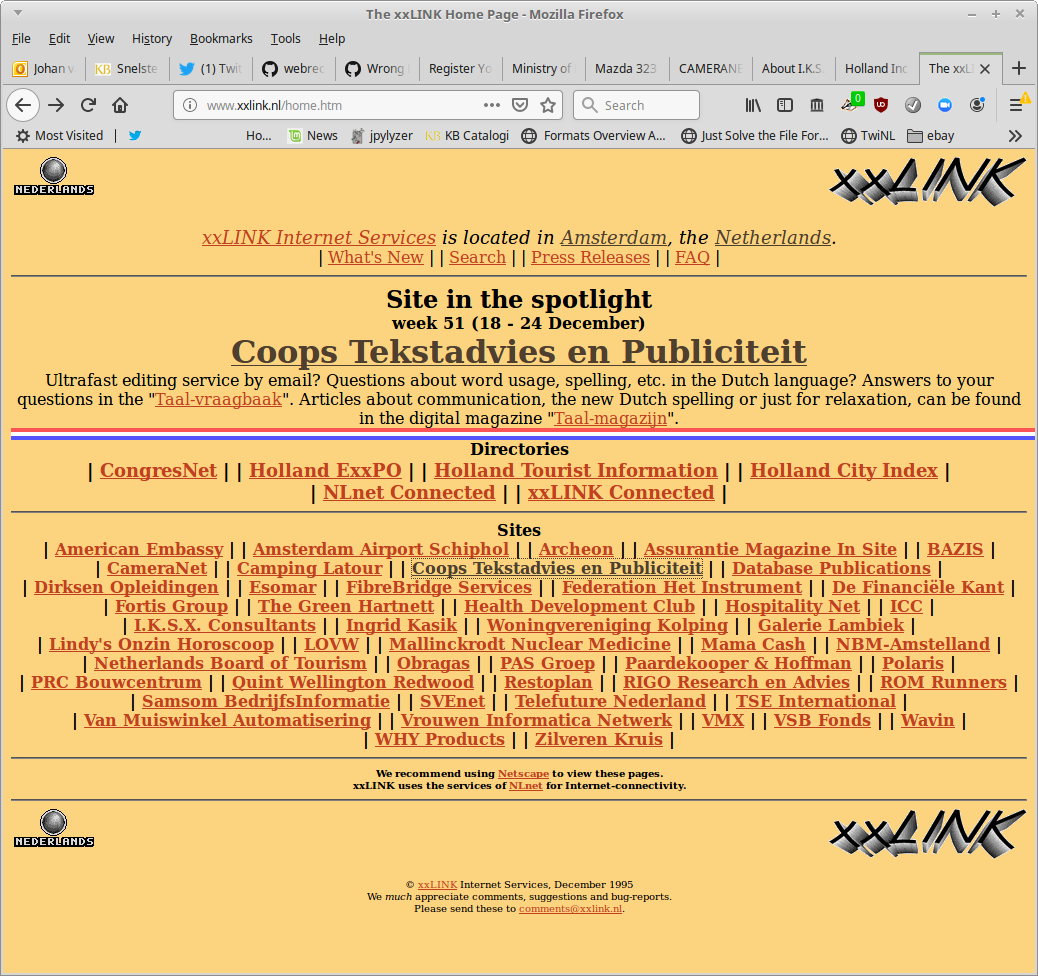
Figure 7 shows a snapshot of the home page of the web site of Schiphol Airport, which pre-dates the earliest snapshot of this site in Internet Archive39 by several months.
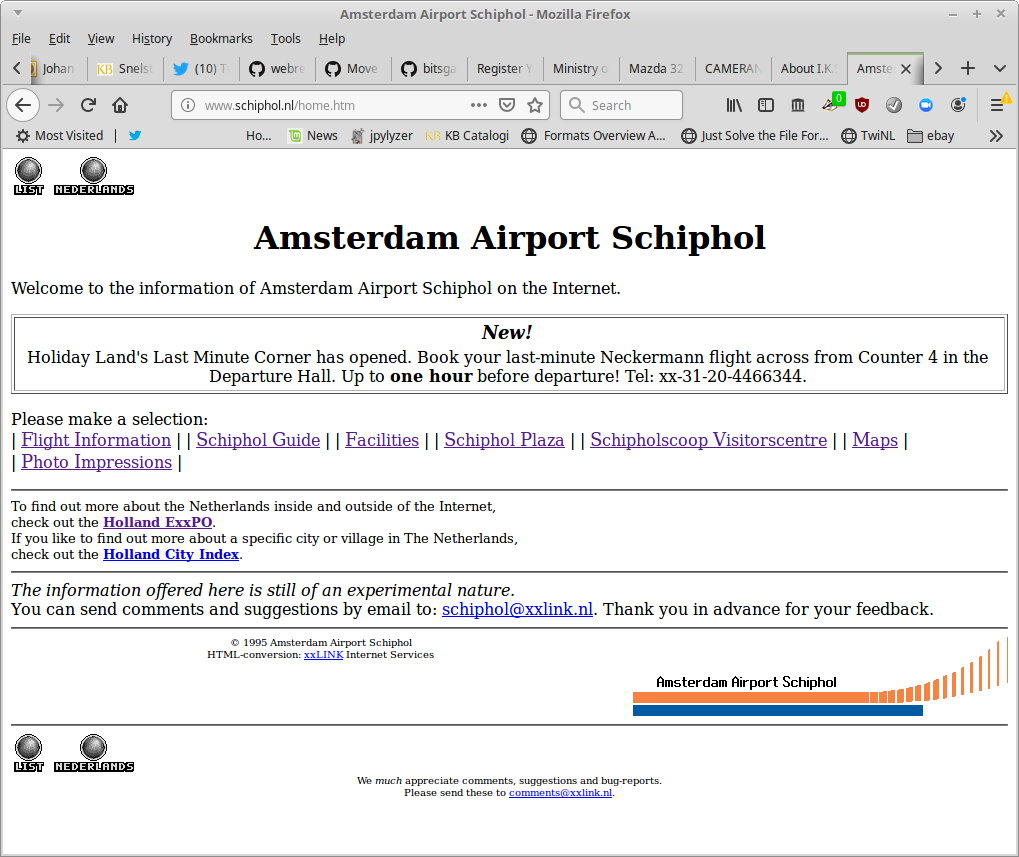
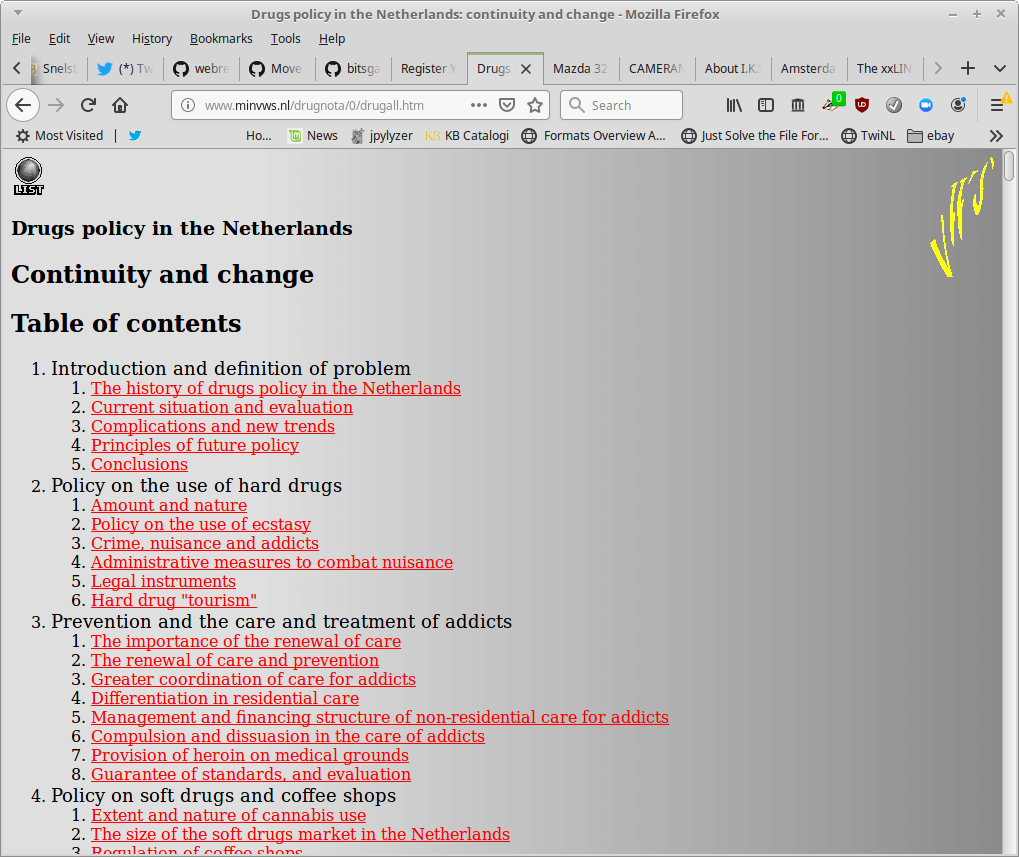
Figure 8 shows a report on drugs policy in the Netherlands, which was published as part of the site of the Dutch Ministry of Health, Welfare and Sport.
Finally, Figure 9 shows a contest published on the site of Dutch publisher Database Publications. The objective of the contest was to correctly identify the web addresses of the home pages shown in the image; free copies of CorelDraw 5.0 were available to five lucky winners.

The site reconstruction procedure will most likely need further refinement. For instance, most of the sites on the 1995 tape are relatively simple static HTML sites, but a few include forms that use CGI scripts, which currently do not work. Also, it is possible that the sites on the more recent (1999) tapes are more complex, but this needs further investigation. Once the analysis and processing of the data from the remaining tapes is complete, a more in-depth report on the reconstruction procedure will be published separately.
Conclusions
In this paper I showed how old DDS and DLT-IV tapes from the ’90s can be read on a modern desktop workstation running Linux (in this case the Ubuntu-based BitCurator environment). I also explained how I created workflows that allow one to recover data from these tapes in a format-agnostic way, using the user-friendly tapeimgr software. Finally I discussed how I then extracted the contents of the resulting files, and how I used this to reconstruct a number of “lost” web sites from 1995. The workflow descriptions are available on Github40, and they will most likely evolve further over time. They are published under a permissive license that allows anyone to adapt them and create derivatives. They describe all aspects of the tape reading process in detail, including the hardware components used and their characteristics, links to relevant documentation, instructions on how to handle the tapes (e.g. how to write-protect them), how to operate the tape readers, and how to use them in conjunction with tapeimgr. The level of detail provided should be sufficient to allow others to reproduce these workflows, and adapt them to their needs if necessary. Since the process of reading data tapes on Linux-based systems is quite standardized, other tape formats that are not covered by this paper can probably be processed in a similar way.
Acknowledgments
First of all thanks are due to Wendy van Dijk and Elizabeth Mattijsen for making the xxLINK tapes available to us, and to Kees Teszelszky, Peter de Bode and Jasper Faase for initiating the Web Archaeology project, and establishing the contact with xxLINK. Peter Boel and René van Egdom are thanked for their help digging out the tape drives and other obscure hardware peripherals, and Willem Jan Faber for various helpful hardware-related suggestions. Finally, thanks are due to the anonymous reviewers who provided valuable feedback to an earlier draft of this paper.
References
[1] B. Sierman and K. Teszelszky, “How can we improve our web collection? an evaluation of webarchiving at the KB National Library of the Netherlands (2007-2017),” Alexandria: The Journal of National and International Library and Information Issues, Aug. 2017. DOI: 10.1177/0955749017725930. [Online]. Available: https://doi.org/10.1177/0955749017725930.
[2] S. Ross and A. Gow, “Digital archaeology: Rescuing neglected and damaged data resources. a jisc/npo study within the electronic libraries (elib) programme on the preservation of electronic materials.,” University of Glasgow, 1999. [Online]. Available: http://www.ukoln.ac.uk/services/elib/papers/supporting/pdf/p2.pdf.
[3] J. van der Knijff, Resurrecting the first Dutch web index: NL-menu revisited, 2018. [Online]. Available: https://www.bitsgalore.org/2018/04/24/resurrecting-the-first-dutch-web-index-nl-menu-revisited.
[4] ——, Crawling offline web content: The NL-menu case, 2018. [Online]. Available: https://www.bitsgalore.org/2018/07/11/crawling-offline-web-content-the-nl-menu-case.
[5] D. Elford, N. Del Pozo, S. Mihajlovic, D. Pearson, G. Clifton, and C. Webb, “Media matters: Developing processes for preserving digital objects on physical carriers at the national library of Australia,” in Proceedings, 74th IFLA General Conference and Council, 2008. [Online]. Available: http://archive.ifla.org/IV/ifla74/papers/084-Webb-en.pdf.
[6] K. Woods and G. Brown, “From imaging to access - effective preservation of legacy removable media,” in Proceedings, Archiving 2009, 2009. [Online]. Available: https://kamwoods.net/publications/woodsbrownarch09.pdf.
[7] K. Woods, C. Lee, and S. Garfinkel, “Extending digital repository architectures to support disk image preservation and access,” in Proceedings of the 11th Annual International ACM/IEEE Joint Conference on Digital Libraries, ser. JCDL ‘11, Ottawa, Ontario, Canada: ACM, 2011, pp. 57-66, ISBN: 978-1-4503- 0744-4. DOI: 10.1145/1998076.1998088. [Online]. Available: http://doi.acm.org/10.1145/1998076.1998088.
[8] C. Lee, M. Kirschenbaum, A. Chassanoff, P. Olsen, and K. Woods, “BitCurator: Tools and techniques for digital forensics in collecting institutions,” D-Lib Magazine, vol. 18, 5/6 2012. [Online]. Available: http://www.dlib.org/dlib/may12/lee/05lee.html.
[9] J. John, “Digital forensics and preservation,” Digital Preservation Coalition, 2012. [Online]. Available: http://dx.doi.org/10.7207/twr12-03.
[10] M. Pennock, P. May, M. Day, K. Davies, S. Whibley, A. Kimura, and E. Halvarsson, “The flashback project: Rescuing disk-based content from the 1980’s to the current day,” in Proceedings, 11th Digital Curation Conference, 2016. [Online]. Available: https://doi.org/10.5281/zenodo.1321629.
[11] A. Prael and A. Wickner, “Getting to know FRED: Introducing workflows for born-digital content,” Practical Technology for Archives, vol. 4, 2015. [Online]. Available: https://practicaltechnologyforarchives.org/issue4_prael_wickner/.
[12] D. Salo, Building audio, video and data-rescue kits, 2017. [Online]. Available: https://radd.dsalo.info/wp-content/uploads/2017/10/BuildDocumentation.pdf.
[13] BitCurator Consortium, Workflows. [Online]. Available: https://bitcuratorconsortium.org/workflows.
[14] T. De Haan, “Project the digital city revives, a case study of web archaeology,” Proceedings of the 13th International Conference on Digital Preservation, 2016. [Online]. Available: https://doi.org/10.5281/zenodo.1255965.
[15] T. De Haan, R. Jansma, and P. Vogel, Do it yourself handboek voor webarcheologie, 2017. [Online]. Available: https://hart.amsterdam/image/2017/11/17/20171116_freeze_diy_handboek.pdf.
Originally published in Proceedings of the 16th International Conference on Digital Preservation, 2019
-
Elizabeth Mattijsen, old xxLINK-homepage: https://liz.nl/xxlink-homepage.htm ↩
-
See e.g. the links in the “Tapes” section at https://github.com/KBNLresearch/forensicImagingResources/blob/master/doc/df-resources.md ↩
-
BitCurator: https://bitcurator.net/ ↩
-
“Digital Data Storage”, Wikipedia: https://en.wikipedia.org/wiki/Digital_Data_Storage ↩
-
“HP StorageWorks DDS/DAT Media - DDS/DAT Media Compatibility Matrix”, Hewlett Packard: https://support.hpe.com/hpsc/doc/public/display?docId=emr_na-lpg50457 ↩
-
“Digital Linear Tape”, Wikipedia: https://en.wikipedia.org/wiki/Digital_Linear_Tape ↩
-
“DLT Drive Media and Cleaning Tape Compatibility Guide”, TapeandMedia.com: https://www.tapeandmedia.com/dlt_capacity_info.asp ↩
-
“Parallel SCSI”, Wikipedia: https://en.wikipedia.org/wiki/Parallel_SCSI ↩
-
“Conventional PCI”, Wikipedia: https://en.wikipedia.org/wiki/Conventional_PCI ↩
-
“PCI Express”, Wikipedia: https://en.wikipedia.org/wiki/PCI_Express ↩
-
“Adaptec Support”, Microsemi: https://storage.microsemi.com/en-us/support/scsi/ ↩
-
“Parallel SCSI”, Wikipedia: https://en.wikipedia.org/wiki/Parallel_SCSI ↩
-
“LVD, SE, HVD, SCSI Compatibility - Or Not”, Paralan: http://www.paralan.com/scsiexpert.html ↩
-
“SCSI connector”, Wikipedia: https://en.wikipedia.org/wiki/SCSI_connector ↩
-
“What kind of SCSI do I have?”, Paralan: http://www.paralan.com/sediff.html ↩
-
“Parallel SCSI”, Wikipedia: https://en.wikipedia.org/wiki/Parallel_SCSI ↩
-
“SCSI termination Q&A”, Adaptec: https://storage.microsemi.com/en-us/support/scsi/3940/aha-3940uwd/hw_install/scsi_termination.htm ↩
-
“dd (Unix)”, Wikipedia: https://en.wikipedia.org/wiki/Dd_%28Unix%29 ↩
-
“file (command)”, Wikipedia: https://en.wikipedia.org/wiki/File_(command) ↩
-
Apache Tika: https://tika.apache.org/ ↩
-
Siegfried: https://www.itforarchivists.com/siegfried/ ↩
-
“mt(1) - Linux man page”, die.net: https://linux.die.net/man/1/mt ↩
-
“Tapeimgr”: https://github.com/KBNLresearch/tapeimgr ↩
-
“Guymager homepage”: https://guymager.sourceforge.io/ ↩
-
“ “Cannot allocate memory” when reading from SCSI tape”, Unix Stack Exchange: https://unix.stackexchange.com/a/366217 ↩
-
“Tape Driver Semantics”, Amanda Wiki: https://wiki.zmanda.com/index.php/Tape_Driver_Semantics ↩
-
“KB Forensic Imaging Resources”: https://github.com/KBNLresearch/forensicImagingResources/tree/master/doc ↩
-
“file (command)”, Wikipedia: https://en.wikipedia.org/wiki/File_(command) ↩
-
“Unix dump”, ArchiveTeam File Formats Wiki: http://fileformats.archiveteam.org/wiki/Unix_dump ↩
-
“restore(8) - Linux man page”, die.net: https://linux.die.net/man/8/restore ↩
-
A step-by-step description can be found here: https://github.com/KBNLresearch/forensicImagingResources/blob/master/doc/extract-dumpfile.md ↩
-
“NTFS”, Wikipedia: https://en.wikipedia.org/wiki/NTFS ↩
-
“Ext4”, Wikipedia: https://en.wikipedia.org/wiki/Ext4 ↩
-
“tar(1) - Linux man page”, die.net: https://linux.die.net/man/1/tar ↩
-
Microsoft Tape Format Specification Version 1.00a: http://laytongraphics.com/mtf/MTF_100a.PDF ↩
-
These steps are described in more detail here: https://github.com/KBNLresearch/nl-menu-resources/blob/master/doc/serving-static-website-with-Apache.md ↩
-
The Apache HTTP Server Project: https://httpd.apache.org/ ↩
-
Link: https://web.archive.org/web/19961018155616/http://www.schiphol.nl/ ↩
-
“KB Forensic Imaging Resources”: https://github.com/KBNLresearch/forensicImagingResources/tree/master/doc ↩
-
tapes
-
web-archaeology
- Restoring Liesbet's Virtual Home, a digital treasure from the early Dutch web
- Recovering '90s Data Tapes - Experiences From the KB Web Archaeology project (iPres 2019 paper)
- A simple disk imaging workflow tool
- Roll the tape - recovering '90s data tapes in BitCurator
- Crawling offline web content: the NL-menu case
- Resurrecting the first Dutch web index: NL-menu revisited

Comments
I have approx. 300 DDS-1/DDS-2 tapes from the 90-s. I’d like to see if data could be read at all after having the tapes stored for 25 years. Is there anything possible with an SCSI drive connected to USB meanwhile?
@chiefenne This is something I considered before going for the approach in my post. From what I remember, some manufacturers of ZIP drives briefly produced SCSI to USB cables in the late ’90s. But last time I checked these were quite hard to find, and usually ridiculously expensive. There’s also a whole load of potential issues you might run into, see e.g. here and here. So personally I wouldn’t bother with that approach.
Since you mention you’re dealing with DDS1 and DDS2 tapes, the HP SureStore DAT8 that I used is probably a good choice here as well. At the time I wrote this, all the hardware and peripherals were available pretty cheap. I’m not sure if this is still the case, but with 300 tapes it’s probably worth the investment. The full details of the setup I used, including adapters, cables and connectors are documented here.
So with that information a couple of eBay searches should probably give you a pretty good idea of what’s possible.
Thanks for your answer and also congrats to your work!